
Anytime you notice a “no signal” on your screen or monitor, it simply indicates a problem with your Xbox One. The only way to solve it is for you to find the possible root causes.
One reason for an Xbox’s HDMI not working is damage to the output system. It could be a problem with your HDMI cable or a flaw in your Xbox. When it comes to connectivity, the HDMI is the Xbox’s sole connector. Thus, it’s inactive without a connection via HDMI. You can choose to fix this problem yourself or seek assistance from an authorized technician to handle it.
Causes and Symptoms of Xbox One HDMI not Working
There are several reasons why your Xbox One HDMI is not working. In order to fix the problem, you must first find the major causes, which include the following:
Also Read:
• Hardware Error
This is usually the most difficult situation to fix. Since you must have the console changed. In this situation, the likelihood of the motherboard chips being affected is high. It is advisable to have a qualified person check it out.
• Damaged Cable
The highest chances of your Xbox One HDMI not working may be due to this factor. A damaged cable or a used cable with breaks will definitely hinder signals from your Xbox One.
• Faulty Hard Drive
When you have a faulty hard drive, it is impossible to successfully run your Xbox One due to its defect.
• Damaged HDMI Ports
Rusted or dirty HDMI ports can affect the overall output of both the Xbox and HDMI cable. Always ensure your ports are kept clean by dusting those areas. In situations where the damage is severe, you will have to go and have it replaced.
• Random Bugs
Some system glitches and bugs can cause the issue, especially after upgrading your Xbox One software.
• Wrong Configurations
This happens when the resolution of your screen or monitor doesn’t support that of the Xbox One. The resolution of your HDMI cable and AVR system must be the same resolution. In addition to the foregoing, you should be familiar with your Xbox One’s HDMI capabilities.
This way, you are certain of the immediate actions to take.
Your screen can do any of the following when the Xbox becomes faulty:
• It shows a black screen
• It can show a black-to-blue glitchy screen
• Send you a “no signal” notification on your screen or monitor.
• In some rare cases, your Xbox will work but suddenly your screen will become blank all over.
It Is important to note that all causes and signs are the same for any Xbox console.
How to Repair Xbox HDMI Failure
Depending on the cause of your Xbox One HDMI not working, you can apply these basic approaches.
Initial Setups
- Blow and brush HDMI ports to remove any dirt or dust that may be present. Keep an eye out for faulty pins and loose ports and avoid using them until they are repaired. You will need an HDMI cable in the range of 1.4, 2.0, or 2.1 for better connectivity for your Xbox One.
- Plug your HDMI cable into a different device with similar ports to check if it works. Or a different HDMI cable should be fixed into the Xbox port. (This way you can know where the problem is coming from.)
- Ensure your HDMI cord has been properly connected to both the TV and console. There should be a “click” heard when you fix the HDMI cord into its port.
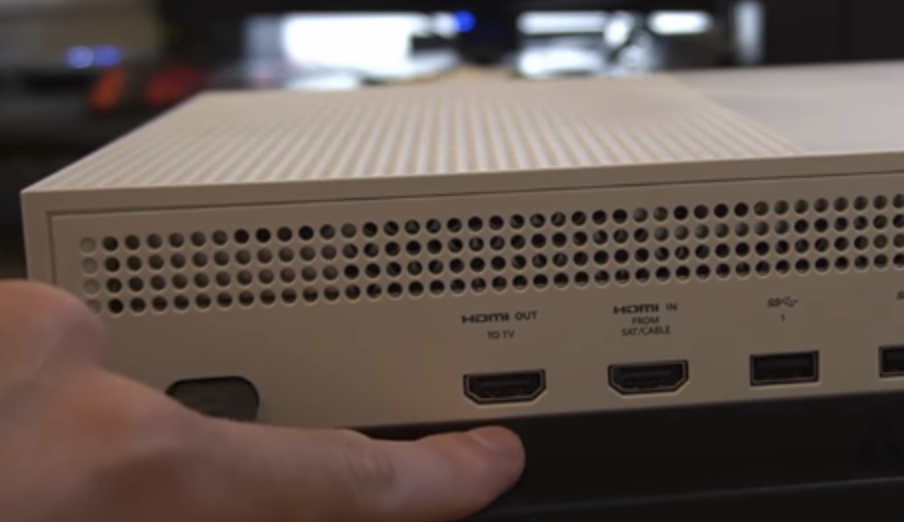
- Fix your HDMI cord into the “Out to TV” port of your Xbox console.
- Go to the settings of your TV and check if it’s set to the right input channel.
- When you plug in a direct power source, check to see if your Xbox One console is turned on.
(Other Procedures)
Power Cycle Your Xbox One Console
Try to give your console a power cycle. This removes excess bugs that constantly affect the system. You execute this by:
- Shutting down your console (press the power button and hold it for a few seconds).
- Remove all HDMI cables merging your console and TV set (doing this for a minute or two allows your power adapter to cool down).
- Connect all disconnected HDMI cords back to their right ports.
- Switch on your Xbox console once again using the controller.
This method works when your Xbox One becomes blank right after going back to the dashboard.
Initiate the Console in Low-resolution Mode
An auxiliary trick is to turn on your Xbox console at a lower resolution. This way, you get to reset your entire console display in the settings.
Procedure below:
- Use the eject button to remove any discs from your Xbox One.
- Press power on the Xbox One console and hold for approximately 10 seconds to switch it off.
- After continuously pressing both the power and eject buttons, you see a power light and another “beep” sound made. This can take another 10 seconds before you rest your fingers.
- Attach your HDMI cable to the HDMI ports.
Right after this, your Xbox One will run in a low-resolution mode of 640 x 480. Since every resolution bug has been resolved and your Xbox One has been reset, to set up a resolution
- Open the “Guide” by pressing your Xbox button.
- Move to “Profile & System”.
- Scroll to “General”.
- Click on “TV & Display” and choose TV display and sound.
- Click on the resolution options available (720p, 1080p, or 4K UHD). Note: You can also choose “Auto Detect” to check for the right configuration to use.
- Finally, you can select “Calibrate TV” as you follow through the steps given.
FAQ: How Do You Update Your Xbox One Console?
Begin by pressing the button on your Xbox controller to open the “Guide.” Then you scroll to “Profile & System” and choose “Settings Profile & System Settings.”
Next, click on “System” and choose “Updates.” Follow through the process to update your Xbox system.
How to Reset Console to Factory Settings
This can be done in Troubleshooter mode. Simply follow the steps below to factory reset your Xbox One console:
1. Turn off your Xbox One console with the power button, just like in the procedures above.
2. Press and continually hold the “Pair and Eject buttons” or only the “Pair button” for about 10 seconds. Take your hands off the buttons after you hear the beep.
3. If you pressed and held only the Pair button, then you must still press it as you press the Xbox button on the console.
4. This redirects you to the “Troubleshoot menu.” Choose “Reset this Xbox”.
5. Now, update the Xbox An offline update is required when your Xbox console is still on the animation screen after an online update.
There’s a full guide for updating your Xbox One offline. But the quickest way is the following:
• Convert any USB drive with 6 gigabytes or more of storage space to NTFS.
• Insert it (the USB drive) into your computer.
• Download “OSU1 The Offline Update.” Now transfer all data from “OSU1” and copy the “System Update” on the drive.
• Disconnect anything from the Xbox console, excluding its HDMI cable and power adapter.
• Turn on the Xbox in Troubleshooter mode and insert the USB drive.
• Choose “Offline System Update” and click “Offline Update.”
It is possible to encounter a “System Error” code during this process. Luckily, each code has a meaning, as explained below:
• E100: This means your console needs to be repaired due to a hardware error.
• E101, E202, and E305—There’s a need for your Xbox One console to be updated offline.
• E102: You need to reset the entire system to factory default.
• E200, E204, E206, and E207: Your Xbox console needs a power cycle in order to function well.
Conclusion
There are several options to consider when dealing with your Xbox One HDMI not working. Since it could be an internal or external issue. Some problems are simple to resolve on your own, while others necessitate the assistance of a trained professional.
There are some things to check on average to make sure you’re on the right track when handling your Xbox One HDMI cables and console. Check out and do the following:
• Check the condition of your HDMI port and cords. Check for your HDMI cable to be inserted in the port that has HDMI-OUT on your Xbox One console.
• Changing your Xbox console’s timer chip and replacing your motherboard.
• Check the wireless controllers on your Xbox. React to it by pressing the Xbox logo button until it turns on.
Your Xbox controllers not switching on wirelessly means you have to recharge the battery. You can also decide to purchase a new battery based on your preference.
Cleaning your Xbox One console helps a lot with clearing dirt and dust. Dust built around the air vents can affect your Xbox One in a negative way. It could cause issues with overheating, which may generate “no signal” errors. To safely execute this, you can use an air gun or vacuum cleaner to blow out any dirt or dust stuck around the air vents.

- Optoma UHD50X vs UHD60 4K UHD Projectors Detailed Comparison - June 27, 2023
- Optoma CinemaX Pro vs P2 Projectors: What is the Difference? - June 27, 2023
- DLP vs Laser Projectors: What is the Difference? - June 27, 2023